Hello everyone! I really appreciate the people who commented on my last post and one of the commenters suggested that I should show you how to make homemade chocolate today. So homemade chocolate it is! Today I am going to show you how to make chocolate in a simple, easy way. Chocolate is a snack that most people buy from stores. But why buy a box of chocolate when you can make it at home? Store bought chocolate has a lot of preservatives, so it is unhealthy. So today we are going to make preservative- free chocolate. The best part is, that it is delicious! So let's get started! You will need:
vegetable shortening
powdered milk (as weird as that might sound)
cocoa powder
icing sugar
salt
Let's get started! The steps are listed below.
Steps
Add all the powdered ingredients including the salt and icing sugar together (don't put in the shortening).
Melt the shortening until it is like water and add that to the mixture and stir thoroughly.
Line a baking tray with with wax paper/ parchment paper and pour the mixture onto the tray.
Place the chocolate into the fridge for two- three hours
Eat!
I hope everyone enjoyed this recipe. Remeber, the comments section is always open for advice, suggestions, or questions. Bye and keep coming for more mouth watering recipes!
Hello readers! It autumn now, so I thought that I shoud share some awesome autumn recipes. Today we will be making sugar cookies. I don't like to eat sugar cookies when they are plain so I am going to be showing you how to make the icing as well. They are a great snack whether you are coming home from work, school, or even when you just want something sweet! Let's get started!
You will need:
granulated sugar
flour
butter
sugar
one egg
baking soda
baking powder
salt
vanilla extract
Let's get started! I decided to try a different format today, so look below for the steps.
Steps
Preheat your oven to 350 Degrees
Line two baking sheets with parchment paper/ wax paper
Combine the butter and sugar together and stir thoroughly
Add the vanillla and egg (stir thoroughly)
Add all the dry ingrediants to the mixture (except the sugar) and stir thoroughly
Roll the mixture into balls (roll them in the sugar too) and place them a reasonable distance apart from each other on the baking sheet
Put the cookies into the oven for about twenty minutes and then on a cooling rack for the same amount of time
I bet you're wondering how this recipe has to relate with autumn at all. Well if you want to make autumn sugar cookies, stay tuned: there's more to come!
For the frosting you will need:
confectioners sugar
shortening
milk
vanilla
orange food coloring
Let's get started!
Combine your confectioners sugar and shortening together and stir thoroughly
Add in the milk and vanilla ans stir until you can dip your figer in and won't find any lumps
Add in the orange food coloring
Frost your sugar cookies
If you want, decorate with sprinkles
Eat!
I hope everyone enjoyed this recipe. Remeber, the comments section is always open for advice, suggestions, or questions. Bye and keep coming for more mouth watering recipes!
Hello readers and a very happy Thanksgiving! Today we are going to make a very special and simple recipe that I had been saving for Thanksgiving day. Today we will make a very special Thanksgiving cake. This should be fairly easy because almost everybody knows how to make a cake, so I will basically be showing you some ways to decorate cakes tht relate to Thanksgiving. Today I will go over two designs that are super easy and fun to decorate. The nice thing is that I will be showing you how to decorte a square and round cake. This is a recipe that your family is bound to love. So let's get started!
For a round cake you will need:
a baked cake (try to have it covered with white fondant)
orange, green, brown, and pink frosting
a fine and thick nozzle to put on your frosting bag
Let's get started! Put on the thin nozzle on the brown frosting and make small swirls at the top of the cake (on the edge). Then place a thick nozzle on the orange icing and squirt large drops of frosting out. Leave a space between each drop. Take your green icing and put on the thick nozzle. Do the same thing as you did with the orange frosting, except place the dots where therer are spaces and don't leave a gap. Place a fine nozzle on the pink frosting and in the middle of the cake, write "Happy Thanksgiving". Lastly, relish with your family!
For a square cake you will need:
a baked cake covered with white frosting/ fondant
brown frosting
orange frosting
a fine, thick, and medium sized nozzle
Let's get started. Leave one fourth of the cake empty. Then, On the edge, take your thick nozzle and squirt little drops of orange icing on the edges (do not leave gaps). Take your brown frosting and avoiding the empty space, write "Happy Thanksgiving". Now starte working in the empty space. Use your slim nozzle and make an outline of a leaf in brown. Make a line vertically in the center of the leaf and and then, using your medium sized nozzle color in the leaf (do not color on top of the line). Take your slim nozzle and make small lines that attach to the center line. These lines should not be any longer than three quarters of an inch. Lastly, enjoy this sweet dish with your family!
I hop everyone enjoyed this post. Once again, Happy Thanksgiving!
Hello readers! Today I am going to share a few facts about Thanksgiving meals back then. This is a short, special post on Thanksgiving. What do you eat on Thanksgiving? Do you eat: Turkey? Potatoes? Pumpkin Pie? Cranberries? What if you had to eat venison? The pilgrims had to eat things like this and they had to eat their grown crops. Many people take their Thanksgiving meal for granted. If pilgrims didn't have the luxuries we do, what did they eat? Let's find out.
First on their list would be the deer that they hunted. Capturing a deer is a big achievement, especially without modern technology. Most deer are fast and their eyesight is sharp. So naturally, deer would a prized meal.
Second would be the cranberries and corn they grew. Are you surprised? Don't be! The cranberries they ate were much unlike the cranberries we eat today. They were not covered in the delicious sauce our cranberries are covered with. The pilgrims grew cranberries, wich they had to pick and eat ripe.
Thirdly, there was the grain. Since this feast was celebrated for the fact that the pilgrims had achieved a wonderful harvest season, the pilgrims and Indians feasted on grain.
Lastly there were the wildfowl. Wildfowl is any type of bird hunted by someone. In addition to the deer, wildfowl was the only thing there was for meat.
I hope everyone enjoyed these facts that I put up for Thanksgiving. If you have a fact to add, be sure to leave a comment! Once again, enjoy your Thanksgiving!
Hello everyone! Today we are going to make another Thanksgiving recipe. Someone commented on my last post informing me that they wanted to see how turkey cookies are made. So today's post is going to be a really simple one because these cookies require no effort and are fun to make with your family. These cookies can be taken to a party or eaten at home. The best part is that kids love these cookies and always want more. So let's get started!
You will need:
candy corn
Oreo cookies
brown and yellow icing
one chocolate candy (shaped as a ball)
Reeses chocolate (three fourths)
Let's get started! Separate your Oreo into two parts. Then, dip your candy corn into the brown frosting and line one of the creamy edges with five candy corn pieces. Take the other Oreo half and spread the brown frosting all over it and stick it on top of the other Oreo. Take one of your Resses pieces and smear the edges with the brown frosting. Take an Oreo and stick it to the bottom of the first Oreo.
Stick the Resees piece into the joint of the two Oreos. On top of the Reeses piece, stick the ball shaped candy, to make the turkey's head (use your brown frosting to stick everything). Cut the tip of a candy corn and stick it on to the head. Use the yellow icing to make the eyes and feet. Lastly, eat!
=This is how the cookies should look
I hope everyone enjoyed this recipe. If you try it out, be sure to leave a commment on how the cookies tasted! Please don't forget to leave a comment if you have any suggestions. I'm running out of ideas.....Bye!
Hello everyone! Thanksgiving is just a few days away! Have you thought what you are going to make for dessert on the day? Well from now until Thanksgiving, I will show you how to make a variety of Thanksgiving desserts. These are fit for parties and you can enjoy them with your family and friends. Today we will be making turkey cupcakes. Don't worry! They do not contain meat and are very simple to make. So let's get started!
You will need:
a mini and regular cupcake tin
cake mix
candy corn
mini and regular paper cups
brown, white, and black frosting
a flower shaped cookie
fruit roll up
brown sprinkles
large marshmallows
Let's get started. First, bake your cupcakes and allow them to cool. (I prefer five regular cupcakes and five large cupcakes). Take your brown frosting and spread it over your cupcakes. (Both mini and large). Then, take your large cupcake and roll the edges in the sprinkes. Take the mini cupcake and roll ONE edge in the sprinkles. Take your candy corn and line the back with white frosting and stick it on to your cookie. (At the edge). Do this five times and the allow the cookie to sit for ten minutes. Take your mini cupcake and stick the candy corn in the middle. Take your black frosting and make the eyes.
(Make sure to make the eyes on the mini cupcake). Create a waddle with your fruit roll up and put it around the candy corn on the mini cupcake. Cut your marshmallow diagonally and place it on the edge of the big cupcake. Stick your cookie in front of the marshmallow and then put your mini cupcake in front of the cookie. Lastly, eat!
belowis is how the cupcakes should look
I hope everyone enjoyed this recipe. Remember to comment if you have any suggestions, advice, or questions. Stay tuned for more Thanksgiving recipes and enjoy!
Hi everyone! I thought that it would be nice to make something fun and cute today. When you hear the word cute, what do you think of? I think of Hello Kitty! These cake pops work for all occasions and they look adorable and really fun to eat. This is also a very simple recipe, and will not consume much of your time. So let's get started!
You will need:
a baked cake
frosting
lollipop sticks
sprinkles (heart shaped)
white chocolate chips
black icing
red icing
yellow icing
white candy
Let's get started! Crumble your cake into a bowl and combine it with the frosting. Then, roll the cake into ovals. Place the balls in the freezer and take them out after fifteen minutes. Attach the sticks to the balls and dip each one into the white candy. Using the white chocolate chips, make the ears. (Stick the chocolate on the top of the head for the ears). Wait for it to cool completely. Then, take the heart shaped sprinkles and make the bow. Put a drop of red icing in the middle. Make the eyes and whiskers with the black icing. Take the yellow icing and put a drop of it in the center of the face to make the nose. Lastly, eat!
I hope everyone enjoyed this recipe. Remember, the comments section is always open for advice, suggestions, or questions. Have a nice day everyone, and I will see you next time. Bye!
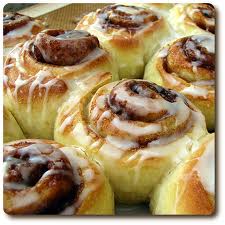
Hello readers! How many people have parties, but don't know what to serve to the guests? Well, today, readers, I am going to show you a treat that is perfect for parties and a simple treat to enjoy at home. Cinnamon rolls! This is a food that makes everyone go hungry. So let's get started!
You will need...
half and half
1/4 cup butter
1/4 cup sugar
1/4 cup powdered sugar
one teaspoon salt
one egg
yeast
one 1/4 cup milk
four 1/4 cup flour
brown sugar
cinnamon
Combine the milk and yeast in a bowl and let it sit for about ten minutes. In a seperate bowl; add the flour, sugar, and salt, butter, and your milk and yeast mixture. With your hands or a kneading device, knead the dough. Add in the egg after three minutes and continue kneading. Roll the kneaded dough in to a ball and place it in a bowl. Allow the dough to rise. Now, place the dough on a non- stick surface and flatten it out. Cover three fourths of the dough with butter.
Then, spread out the cinnamon, brown sugar, and sugar on the dough. Roll up the dough (NOT IN A BALL!!) from the long side. Cut the dough evenly (the way cinnamon rolls are shaped). Put the dough aside for about 30 minutes (if you don't get what to do, there will be a visual or you can just leave a comment). Now, just place them in the oven for another 30 minutes. While the cinnamon rolls are in the oven, make the icing. Combine powdered sugar and the half and half. As soon as your cinnamon rolls are out of the oven, ice them! Lastly, eat! I know this has been a very long recipe, but don't worry, all the hard work pays off. Remember to leave a comment if you have: anything to say, questions, suggestions, or advice. Improve your cinnamon rolls by the "tips" section below. Enjoy! Tips:
serve with cinnamon sticks or coffee
coat in sugar
add extra cinnamon on the top
pictures from: https://www.google.com/ video from: http://www.youtube.com/
Hello readers! Have you ever settled down to watch a movie? Did you want to have something to eat while watching it? How many of you had to eat nothing because you didn't have anything? Well today, readers, we are going to make something that is nice, simple, and very tasty. How would you like to have chocolate fudge? I know I would like to enjoy the taste of chocolate fudge during a movie! So let's get started!
You will need...
chocolate
butter
condensed milk (sweetened)
a whisk
baking tray (lined with parchment)
Let's get started! Combine the butter and condensed milk in a bowl and put it in the microwave for two minutes.
Stir thoroughly. Add th chcolate and stir it again until it is smooth. Pour the fudge in the baking tray and make it even. Put it in the oven for about two- three hours. [You probably want to start making this at least four hours before the movie :) ] Cut the fudge into peices and eat!
I hope everyone liked this post. Remember the comments section is always open for advice, questions, and suggestions. Improve this recipe by the "tips" section below. That is all for now. Bye, and I hope to see you again!
TIPS:
spread white chocolate over the top of the fudge
coat in powdered sugar
make vanilla icing and spread all over the fudge for an extra sweet taste
Hi readers! Today we will make chocolate truffles! Everyone loves these and tends to buy them from the stores. But the store bought ones contain a lot of fat and sugar. So today we will make truffles that are homemade and don't have preservatives. So let's get started! You will need:
2 1/2 cup of whipping cream
one teaspoon vanilla extract
2 tablespoons of butter (melted or soft)
granulated sugar
1/2 cup cocoa powder
chocolate (small chunks)
powdered sugar
Let's get started! Combine butter and chocolate in a bowl. Then, in a saucepan, combine whipping cream, sugar, vanilla and set it to boil. Once the mix has boiled add it in to the mix in the bowl. Stir thoroughly. Let the mix cool for about fifty minutes. Then, pour all the mixture in a frosting holder/ plastic bag/ piping bag. Line a surface with wax paper and squirt out a little bit of the mixture so that each ball is spread apart. Let them cool for about forty minutes. Then, take a new sheet of wax paper and combine the cocoa powder and sugar. Roll the cooled truffles into the mix. Take chocolate and put it in to the microwave for about 30 seconds. Coat the truffles with chcolate two times. Lastly, eat!
I hope every one enjoyed this post. Remember, the comments section is alwaays open for advice, suggestions, and questions. Look at the "tips" section to make your truffles better. Enjoy! TIPS:
Hello readers! What will you have for dessert tonight? Are you... confused? Still thinking? Will you have nothing, because you can't think of anything? Well readers, today we will make a delicious dessert that is fit for any occasion. You can bring this to parties or just simply enjoy at home with family. Today we are making pumpkin pie. My mouth is watering, so we better get started!
You will need:
two cups flour
1 1/2 teaspoon of salt
butter
water (three tablespoons)
two eggs beaten
pumpkin (two cups)
3/4 cup sugar
one teaspoon cinnamon
one half ginger
one fourth teaspoon cloves
Let's get started! Combine the flour, one teaspoon of salt, half of the butter (cut in cubes). Mix thoroughly. Add the rest of the butter and water. Stir the mix. Flatten your crust so it resembles a CD (though not with the hole in the middle). Stick the mixture in to the fridge. While the crust is cooling, make the filling. Combine the pumpkin, sugar, eggs, cinnamon, ginger (grated), cloves, half teaspoon of salt, and pumpkin. Stir thoroughly. Take your crust out of the fridge and shape it the way you like. Pour in the filling and stick in the oven for about 15 minutes and at 425 Degrees. Then set the oven to 300- 315 Degrees and pull out until you can stick a toothpick in the center and pull it out clean. Let it cool for about fifteen minutes. Lastly, eat!
I really hope that every one enjoyed this post and found it helpful. If you have any comments, suggestions, advice, or questions then the comment section is always open. Improve your pie by the "tips" section below and enjoy! Tips:
add whipped cream to garnish/ make the pie more flavorful
sprinkle the top with powdered sugar
if the crust is soft, put it in the oven for 5- 10 minutes at 180 Degrees
Who likes to have donuts but doesn't want to buy them from stores? I know I do and most of you do too! Well readers, today I am going to show you the homemade recipe for donuts! This mouthwatering recipe is healthier than most stores. Store bought donuts have many preservatives and a lot of sugar in them.So let's get started!
You will need:
two teaspoons vanilla
1/2 cup milk
rice drink
two eggs
two tablespoons butter
donut mix
donut pan
Let's get started! Combine all the wet ingredients into the mix and stir thoroughly. Pour the mixture into the donut pan. Put the donut pan into the oven for about 10-12 minutes. Pop them out of the oven and they are ready to eat! If you want you can make chocolate frosting and spread it all over the donut to make the donut extra special and sweet.
For the frosting you will need:
two cups powdered sugar
two tablespoons unsweetened baking chocolate
two tablespoons butter
three tablespoons water (make sure it is heated)
saucepan
Let's make the frosting. Melt the chocolate and butter in a saucepan. Stir thoroughly and allow it to become smooth. Add the sugar and water. Mix together and make sure it's smooth. It's ready! Spread it all over the donuts and you will find the donuts extra special and mouthwatering!


